Networked Audio Tutorial
This tutorial demonstrates how to set up and communicate via a networked DIS radio using V+ between two desktop computers. There are many radio features available when using V+ that are not shown here. This tutorial is the simplest possible V+ design for networked radios in DIS.
This tutorial will work for cases where you need to setup just one computer to receive an existing DIS radio signal as well, just ignore the other computer.
Requirements
This demo requires the items listed below. If SimPhonics' V+ Run-time System software is not installed on your system, you can download by clicking on the product name.
|
Hardware Requirements
|
|
|
|
Software Requirements
|
|
|

Complete the following setup on both computers.
-
Connect two computers via a TCP/IP network. Verify that both computers can ping each other via the DOS ping command. If necessary assign a fixed IP address to each computer. Contact your network administrator if you need assistance.
-
Connect multimedia/computer headset headphone plug to the speaker jack. If you are using a USB headset, simply plug in the headset to a USB connector; be sure to do this before starting V+ below.
-
Connect multimedia/computer headset microphone plug to the microphone jack.
-
Verify that on both computers, the headset/microphones are setup properly.
Verify that the sound card you will be using is the only sound card on the machine, or that it is set as the default sound card for both record and playback. A USB headset may be used for this purpose, however, the USB headset must be the default audio device. (Otherwise, the audio may be routed from and to another sound device in the computer.)
Verify that you can playback to the headset and record the microphone on each computer using the Windows XP Audio Recorder. This can be found at: Start Menu/All Programs/Accessories/Entertainment/Sound Recorder. You must be able to playback your own voice that you have recorded in order for this tutorial to work.
Note that there are many types of sound cards and controls for these cards.

Each desktop computer requires one V+ worksheet to operate. This file contains the Push-To-Talk (PTT) radio design and is installed with V+.
Complete the following procedure on both computers.
-
Download and install the V+ Development Software. The installation will install V+ and some sample V+ files.
-
Select Start/Programs V+/V+ Development System to launch the V+ development system application.
-
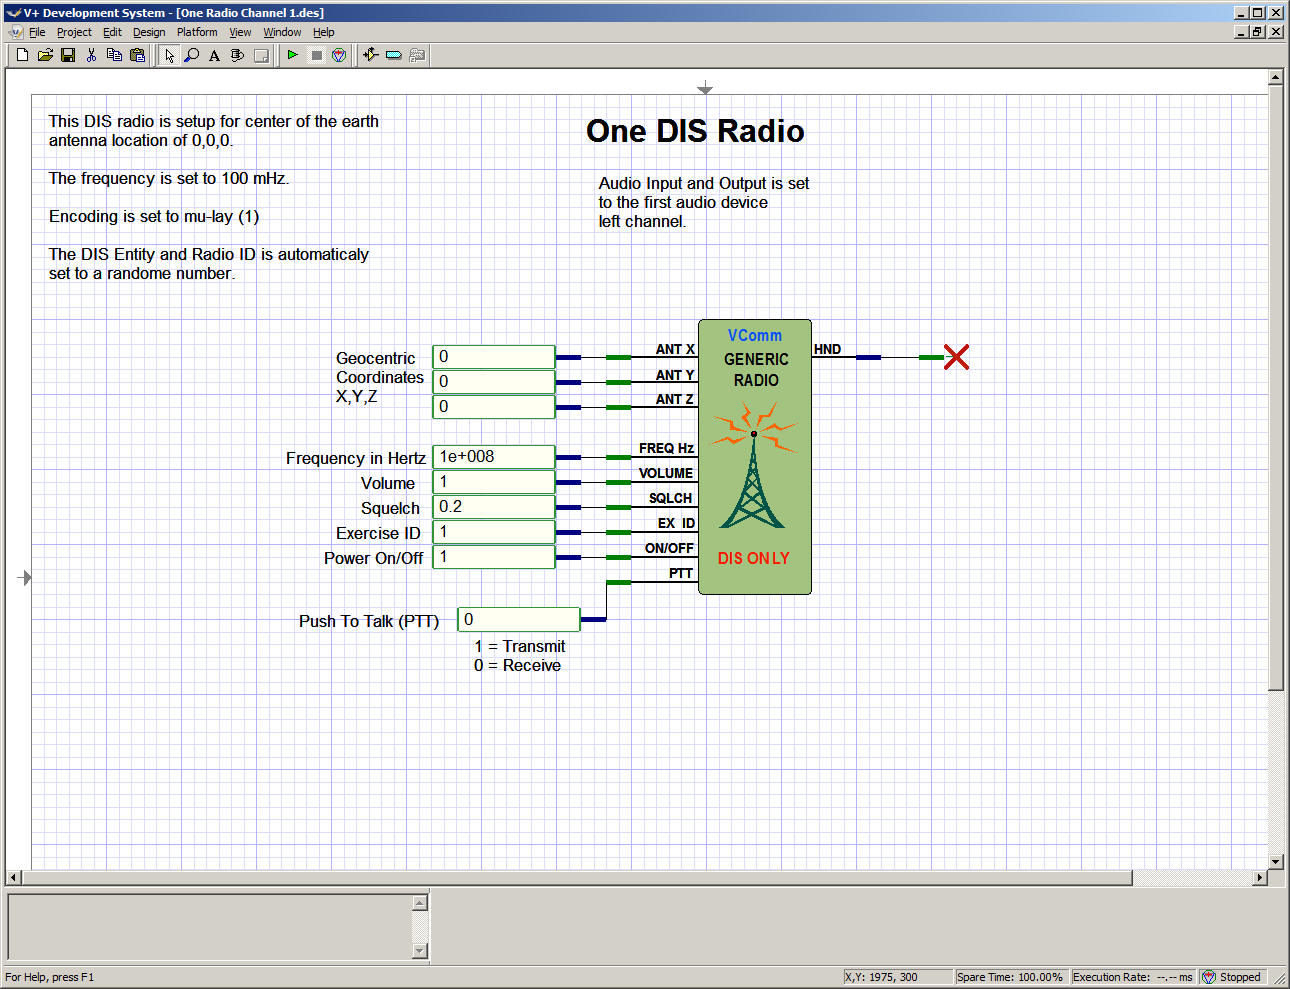
Two windows will appear. From the V+ Development System window, Click File/Open, browse and open the following file.
C:\Program Files\VPLus\VPLus Samples\VComm\One Radio Channel 1.des
This file can also be downloaded from SimPhonics web site at:
http://www.simphonics.com/library/VPLusSamples/VComm/
The V+ Development system window now shows the following.
-
Once both computers have the same file loaded.
Select the icon, located at the top of the V+ Visual Programming System window, to start the
design.
icon, located at the top of the V+ Visual Programming System window, to start the
design.
-
The design should now be running. This is indicated in the message box, located in the bottom left corner of the V+ Visual Programming System window. The object will also have a thin light green outline around them.
-
Your radios are now ready to communicate.

Assign one person to each computer. With headsets on, alternate talking and listening.
Talking (Transmitting)
To talk on a radio, double click inside of the constant object to the right of the text Push To Talk (PPT). A control will appear as shown below. Click the screwdriver icon at the top right of this control and set 1.0 and click OK. Close the control by clicking on the top left of the control. When the control is set to 1.0 the transmitter is operational and your headset microphone audio is being transmitted to the other computer. When set to 0, the radio is receiving.
Listening (Receiving)
Listening requires no action other than
making sure the constant discussed above set to zero.
See the diagram below for more information.
Adding Functionality
To add functionality, you simple add objects to the handle output pin of the radio. SimPhonics PTT headsets (available from SimPhonics) feature a PTT switch for example that can be connected to the PTT pin for control of the PTT switch from the headset. This is done through the Joystick I/O device in V+ since the PTT switch is exposed to V+ via a joystick input. In fact, a joystick could be used for this purpose also.
For example, the following graphic shows a radio connected to a wave file player object that could be used to simulate a jammer or generate automated chatter on the network from a wave file, or generate transmitted tones for secure radio types, and more.
V+ is a very powerful programming system. The applications are endless. Based on the objects in V+, if you can think of it, you can probably do it in V+. By using combinations of objects in V+, virtually any type of radio can be simulated from HAVEQUICK to secure systems.
Be sure to check out the remaining sample files that are available on the SimPhonics web site at: http://www.simphonics.com/library/VPLusSamples/VComm/
Contact SimPhonics if you have any questions/comments.